7 Simple Steps for Grilling Chicken Breast on a Gas Grill
Cooking perfect grilled chicken breast on a gas grill can feel tricky, especially if you’re aiming for juicy, evenly cooked meat every time. Many people struggle with dryness or uneven heat, but don’t worry—you’re not alone.
With a few simple steps, you can master grilling chicken breast effortlessly.
Start by trimming excess fat and pounding the chicken to an even thickness for even cooking. Preheat your gas grill on high for 10-15 minutes, then clean the grates.
Season or marinate your chicken to boost flavor, then place it on the grill, using direct or indirect heat as needed.
Cook until the internal temperature reaches 165°F. Rest for a few minutes, then serve.
Want to perfect your grilling technique and avoid common mistakes? Keep exploring.
Key Takeaways
- Preheat the gas grill to high heat for 10-15 minutes to make sure everything cooks evenly.
- Prepare and marinate the chicken for at least 30 minutes to boost flavor and keep it juicy.
- Pat dry the chicken and place it on the grill over direct heat, cooking undisturbed for 2-3 minutes per side.
- Use a meat thermometer to check that the internal temperature reaches 165°F (74°C).
- Let the chicken rest for 5-10 minutes before slicing to keep it juicy and tender.
How to Prepare Chicken Breast for Grilling
Before you start grilling, you need to properly prepare the chicken breasts to guarantee they cook evenly and stay juicy. Start by trimming excess fat and removing any tendons.
To prevent uneven cooking, pound the thicker parts of the chicken breasts to an even thickness. Regarding marinating techniques, a simple marinade with oil, acid (like lemon juice or vinegar), and seasonings works best.
Pound thicker chicken parts to even thickness for uniform cooking and optimal marinating results.
Marinate for at least 30 minutes but no longer than 4 hours to keep the chicken tender. Proper chicken storage is essential; always keep raw chicken refrigerated and store it in a sealed container to avoid cross-contamination.
Before grilling, pat the chicken dry to promote even browning and prevent flare-ups. Remember, a well-prepared chicken breast is key to juicy, flavorful results.
Taking these steps ensures your chicken is ready for the grill, cooked to perfection every time.
How to Season and Marinate for Maximum Flavor
To maximize flavor, seasoning and marinating are essential steps that boost your grilled chicken breast. Well-seasoned chicken offers flavor infusions that make each bite exciting.
Start by choosing a simple blend of salt, pepper, garlic powder, and herbs for a quick dry rub. For deeper flavor, marinate your chicken using techniques like combining olive oil, lemon juice, soy sauce, and spices.
Marinating not only tenderizes the meat but also allows flavors to penetrate deeply. Aim for at least 30 minutes, but for stronger flavor, marinate for several hours or overnight in the refrigerator.
Be sure to turn the chicken occasionally to ensure even coverage. Avoid over-marinating, as acidic ingredients can break down the meat too much.
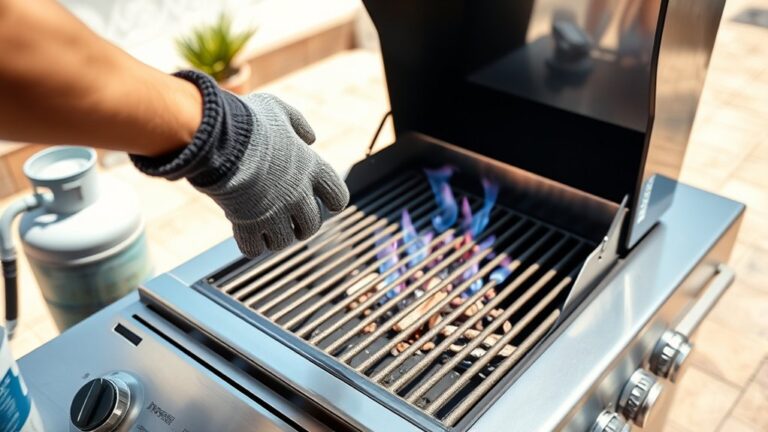
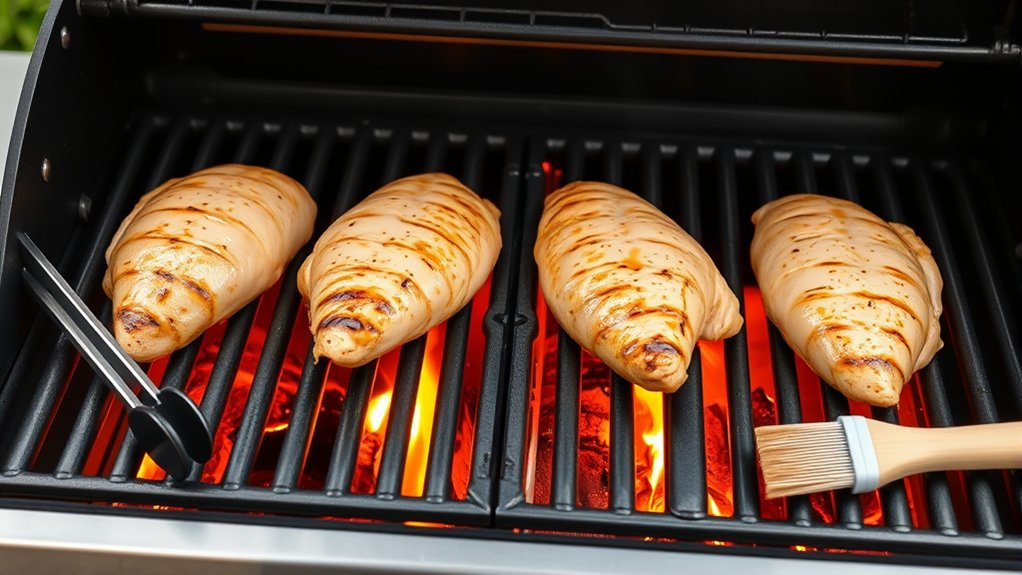
How to Set Up Your Gas Grill for Perfect Cooking
First things first, give your grill a good cleaning to get rid of any leftover residue—this helps ensure your chicken cooks evenly and tastes great. Once it’s clean, preheat the grill to the right temperature; this way, you’re ready to start cooking without any delays.
Next, think about how you want to set up your heat zones. You can adjust the flames to create direct heat for quick searing or indirect heat for slower, more even cooking—whichever works best for your chicken. And don’t forget to keep your grilling tools nearby! Having a good pair of tongs and a spatula makes flipping and handling the chicken safer and much easier.
Clean and Preheat Grill
Ensuring your grill is clean and properly preheated is key to perfectly grilled chicken breasts. Good maintenance prevents flare-ups and helps cook evenly. Safety precautions also keep you protected from accidents.
Start by cleaning the grates with a wire brush to remove leftover residue and debris from previous use. Wipe down all surfaces and check for any blockages or leaks in the gas lines.
Once everything’s clean, open the lid and turn on the burners to high heat. Let the grill preheat for about 10-15 minutes. A hot, clean grill creates nice sear marks and helps prevent sticking.
Proper preheating ensures your chicken cooks evenly and cuts down on flare-ups. It makes your grilling safer and more effective.
Adjust Flame Settings
Wondering how to get the perfect flame for grilling chicken? Proper flame control and heat adjustment are key.
Start by turning on your gas grill and setting the burners to medium-high. Once heated, adjust the flames to create a consistent, steady heat—aim for a gentle, even glow.
Use the knobs to fine-tune the flame size, making sure it’s not too high to burn the chicken or too low to undercook. Here’s a quick guide:
| Flame Level | Heat Effect | Ideal Use |
|---|---|---|
| High | Intense, rapid cook | Searing or boiling |
| Medium-High | Hot, steady | Grilling chicken breasts |
| Medium | Moderate heat | Indirect cooking or slow grilling |
| Low | Gentle, low heat | Keeping food warm, slow cook |
Controlling the flame allows for perfect heat adjustment, so you get tender, juicy chicken every time.
Use Proper Grilling Tools
Setting up your gas grill properly is key to getting perfect cooking results. Using the right grill accessories, like long-handled tongs and spatulas, makes handling chicken safer and easier.
Invest in a reliable cooking thermometer to monitor the internal temperature without lifting the lid. This helps ensure your chicken reaches the perfect doneness every time.
Keep a digital or analog thermometer nearby to check the grill’s temperature as well. Having these tools on hand helps you stay in control and cook with precision.
Proper tools also prevent cross-contamination and make flipping or moving the chicken effortless. Always clean your grill accessories after use to keep them in good shape.
With the right tools, you’ll streamline your grilling process and serve perfectly cooked chicken every time.
How to Grill Chicken Breast to Juicy Perfection

Want your chicken breast to come out juicy and full of flavor? The key is starting with a good marinade—that helps lock in moisture and boosts the taste. Just a quick soak in some herbs, spices, and maybe a bit of lemon juice can make a big difference.
When you’re ready to grill, keep an eye on those grill marks. Aim for clear, nice lines—that’s a sign your chicken is cooking evenly and looks pretty tempting. With these little tricks, you’ll be serving up tender, delicious chicken every time.
Proper Marinating Techniques
Marinating chicken breast properly is key to getting juicy, flavorful results on the grill. The right marinade infuses the meat with delicious flavors and keeps it moist. To get the most flavor, aim for a marinating time between 30 minutes and 2 hours. If you marinate for too long, the texture might suffer.
When making your marinade, use ingredients like citrus, herbs, garlic, or soy sauce to add depth. Remember, a good marinade should enhance the chicken without overpowering it.
Here are some tips: Use a zip-top bag or a shallow dish for even coverage. Turn the chicken halfway through marinating. Keep it refrigerated during the process. Pat the chicken dry before grilling to get a nice sear.
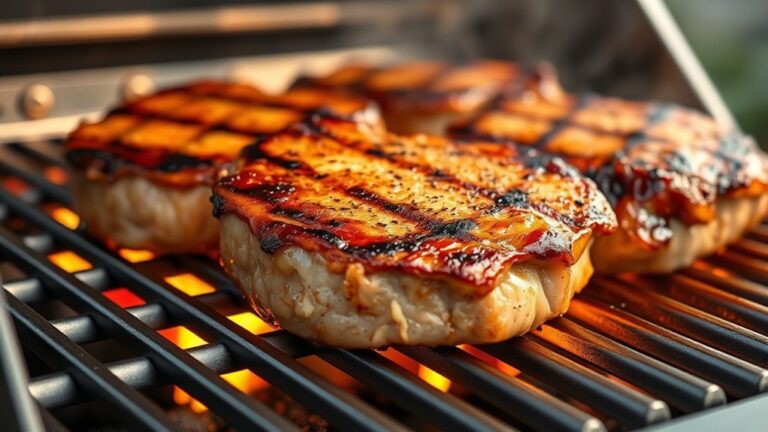
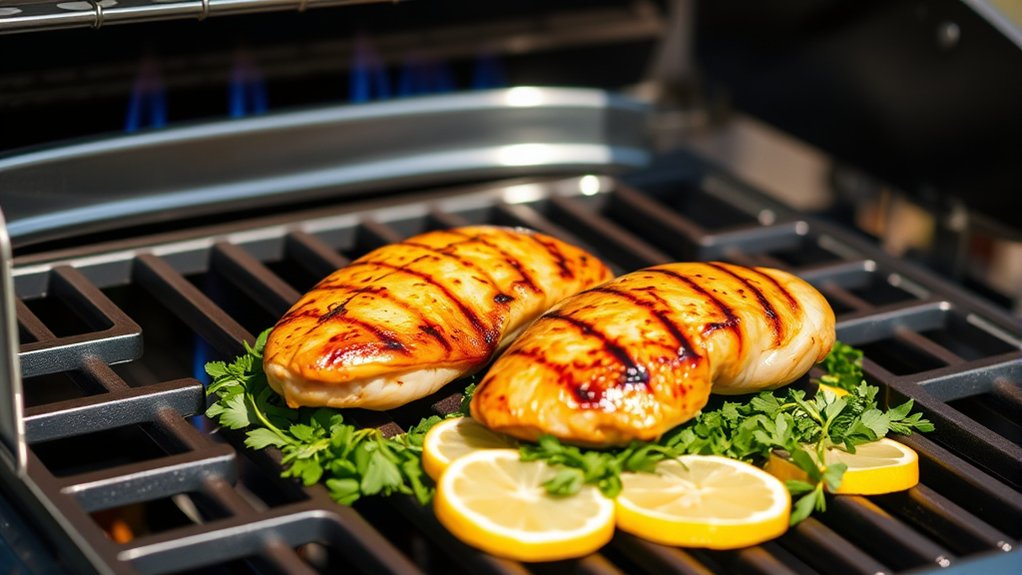
Achieving Ideal Grill Marks
Achieving perfect grill marks on chicken breast not only makes it look more appealing but also shows it’s been properly seared and cooked with good heat. To get those signature lines, make sure your grill is preheated to high heat and is clean.
Place the chicken on the grill, then resist the urge to move it right away. Let it cook undisturbed for 2-3 minutes so the grill marks can form.
Next, rotate the chicken 45 degrees and cook for another 2-3 minutes. This creates those nice crosshatch patterns.
These grill marks aren’t just for looks—they boost flavor by creating caramelized edges.
Properly done, they show you’ve achieved a good sear, adding depth to the taste while sealing in juices for a juicy, flavorful bite.
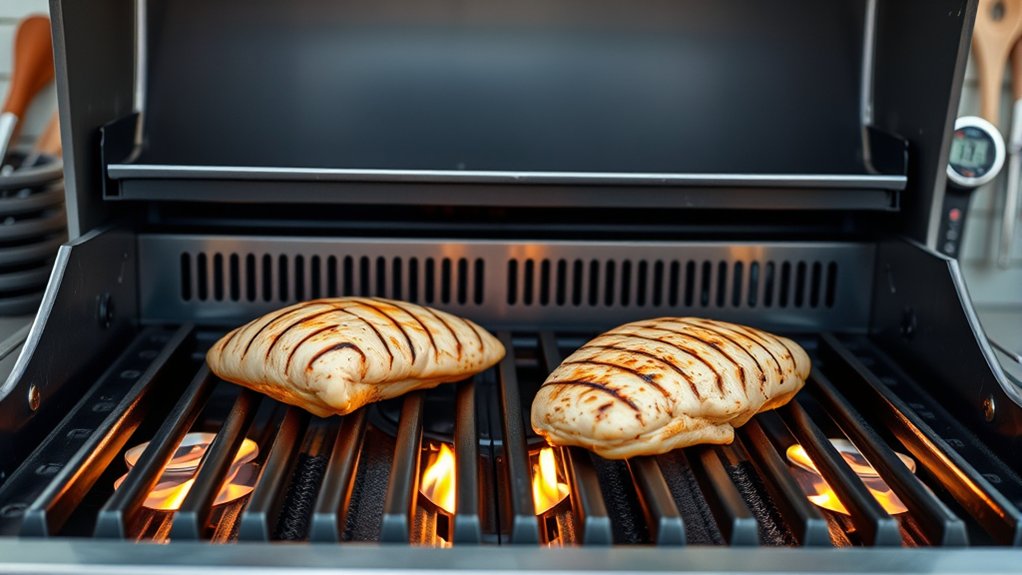
How to Check for Doneness and Rest Your Chicken
Once your chicken breast hits the desired internal temperature, it’s important to remove it from the grill and let it rest. This step helps keep the meat juicy and tender. To check if it’s done, insert a meat thermometer into the thickest part of the breast; it should read 165°F (74°C). You can also look for clear juices as a visual cue.
Resting allows the juices to redistribute, which prevents the chicken from becoming dry. While resting, loosely cover the chicken with foil to keep it warm. Avoid slicing right away; wait 5-10 minutes for the juices to settle. If you don’t have a thermometer, feel the meat’s firmness to gauge doneness.
Common Mistakes to Avoid When Grilling Chicken
Grilling chicken can be straightforward, but certain common mistakes can ruin your meal. One of the biggest pitfalls is overcooking, which makes the chicken dry and tough. Keep a close eye on the temperature and use a meat thermometer to avoid overdoing it.
Uneven cooking is another common issue. It’s often caused by inconsistent heat or placing the chicken unevenly on the grill. To fix this, arrange the chicken evenly and switch to indirect heat when needed.
Here’s a quick rundown of mistakes to watch out for:
| Mistake | Solution |
|---|---|
| Overcooking | Use a thermometer and remove chicken promptly |
| Uneven cooking | Maintain consistent heat and flip regularly |
| Not preheating the grill | Preheat thoroughly for even heat distribution |
| Ignoring resting time | Let the chicken rest to keep the juices in |
Skip these mistakes, and your grilled chicken will come out juicy and evenly cooked every time.
How to Serve and Enjoy Your Grilled Chicken Breast
Wondering how to make the most of your perfectly grilled chicken breast? The key is presentation and flavor enhancement. Start by garnishing with fresh herbs like parsley or cilantro to add color and aroma.
Enhance grilled chicken with fresh herbs and vibrant presentation for maximum flavor and visual appeal.
For an extra touch, place lemon wedges nearby so you can squeeze fresh juice for brightness. When serving, think about pairing wine; a crisp Chardonnay or light Sauvignon Blanc pairs nicely with the smoky flavor of the chicken.
Here are some tips to elevate your dish:
- Slice the chicken against the grain for easier eating
- Serve with grilled vegetables or a fresh salad
- Drizzle with a flavorful sauce like chimichurri or balsamic glaze
- Use a colorful platter to make the dish visually appealing
Frequently Asked Questions
What Is the Best Type of Wood Chips for Grilling Chicken?
You should choose fruit woods like apple or cherry for chicken because they add a mild, sweet flavor that pairs well with the meat. Hickory or pecan can also work if you want a richer, smoky taste.
When selecting chips, go for quality, freshly soaked wood chips to ensure good smoke production. Your choice of chips can really influence the flavor, so pick according to the taste you’re aiming for.
Can I Grill Chicken Breasts Directly From Frozen?
You shouldn’t grill chicken breasts directly from frozen because it can lead to uneven cooking and safety concerns. Frozen chicken needs to be fully thawed for grilling safety, ensuring the inside reaches a safe temperature without overcooking the outside.
Thaw your chicken properly in the fridge or water, then grill it. This way, you’ll get juicy, safe, and evenly cooked chicken breasts.
How Do I Prevent Chicken From Sticking to the Grill?
To stop chicken from sticking, treat your grill like royalty! Use marinade techniques that create a barrier, making the surface slippery like an ice rink.
Always preheat your grill and oil the grates generously with a grill brush or grilling accessories. This helps prevent sticking and makes flipping easier.
Place the chicken carefully, and don’t flip too soon. Wait for those perfect grill marks—that’s when the chicken releases naturally.
With patience and the right tools, your chicken will slide off like magic!
What Internal Temperature Ensures the Chicken Is Safe to Eat?
You should cook chicken to an internal temperature of 165°F to guarantee it’s safe to eat. Use a reliable meat thermometer to check this during grilling.
Incorporate cooking techniques like flipping the chicken halfway to ensure even heat distribution. Marinade options, such as lemon juice or yogurt, can help keep your chicken moist and flavorful.
Keep an eye on the temperature to prevent overcooking, so you can enjoy juicy, safe-to-eat chicken every time.
How Long Can Grilled Chicken Breasts Be Stored Safely?
Sure, your grilled chicken breasts can last in your fridge for 3 to 4 days—if they survive your marinating techniques and grilling tips. After that, they start dreaming of the compost heap.
To keep them fresh, store them in airtight containers and always check for signs of spoilage. Remember, even the most perfectly grilled chicken can turn into a science experiment if left too long.
Conclusion
Now that you know these simple steps, your grill will become a gateway to juicy, flavorful chicken each time. Imagine the aroma of perfectly grilled chicken filling your backyard, a symphony of sizzle and smoke inviting everyone to the feast.
With practice, your skills will shine brighter than the flames. You’ll turn every meal into a memorable masterpiece. So fire up that grill and start your chicken grilling adventure.
Deliciousness is just a few steps away when you master grilling chicken breast on a gas grill. Get ready to enjoy perfectly cooked, tender chicken every time.